How to Clean Your Optics
The existence of dirt, contaminants, smudges, stains, and particulates on the optical surfaces of optics could be impeding and disturbing the proper operations and functions of optics. Hence, in order to lengthen the application span of the optics and promote the performance of the optical systems, knowing How to Correctly Clean Your Optics becomes helpful and crucial. For different kinds of optics (e.g. Bare Metallic Substrates, Coated Optics, Flat and Spherical Lenses, micro-optics, grating, etc.) different treatments are needed, cleaning optics without guidance could damage or even devastate the optics. Shalom EO is going to introduce the most common methods for cleaning optics in this article, in addition to some cautions that need to be taken and important points during the procedures. Note that this article is merely a general guideline, for optics that require special treatment, contact us for more instructions about how to clean your optics.
The cleaning methods introduced in this article are appropriate for most of the optics, however, there are some exceptions. Some optics are extremely delicate and sensitive therefore any cleaning procedure exerting force on the optical surface is not recommendable to these optics. Some examples include optics with holographic gratings/ruled gratings, bare metallic substrates, metallic coatings, pellicles, and other soft coatings. In fact, the only method allowed for cleaning these optics is the blowing method, which will be introduced in the later section of this article.
Wear gloves or finger cots all the time, for a few optics (e.g. bare metal) the stains of fingerprints could be permanent. Also, mind the handling environment before you start. Ensure the environment is clean and exempt from dust (a cleanroom or a laminar flow bench are especially recommendable), and for optics made from hygroscopic materials, humidity should be prevented. Furthermore, most crystals are thermal-sensitive, so it is a necessity to keep the temperature appropriate and controlled before you open the container. Talking or chewing gums during the process is forbidden since it might increase the risk of saliva deposition on the optic (It would be best that you wear a
Instruments:
For the wipers, cotton swabs, cotton tips, cotton balls, and lens tissues are all acceptable. For the bath/immersion method, you will need a petri-dish to place the optic and the solvent. Gloves or finger cots, delicate tweezers or hemostats, blowers, and reagent grade solvents are all useful.
Solutions and Solvents
The most conventional solutions and solvents are acetone, methanol, and isopropyl alcohol. Generally, methanol is the most acidic among the three so it is possible to damage the optic if not handled with care, but it has the advantage of fast evaporation so it is less likely to leave streaks or stains on the optic. Acetone is good at removing grease but relatively detrimental to human bodies and you have to wear a pair of impenetrable gloves. Additionally, you should never use acetone to clean plastic optics since acetone is corrosive to plastic. Isopropyl alcohol is the safest one, however, it reacts with aluminum and therefore should not be applied to bare aluminum or aluminum coatings. A mild soap solution is also acceptable if methanol, acetone, or isopropyl alcohol is not strong enough, but do not forget to rinse the optic with de-ionized water afterward.
The solutions and their prohibitions are listed in the table below:
Solution |
Should be avoided to be applied to |
Alcohol |
Aluminum Substrates/Aluminum Coatings |
Acids (HCL, HF, etc.) |
Coatings/ZnS, ZnSe/Visual and UV Optical Glass (e.g. UVFS, CaF2, MgF2, N-BK7) |
Acetone |
Plastic Optics |
Soap Solutions |
Bare Metallic Substrates and Deep-UV Coatings, Spherical Lenses, Cemented Optics, Alluminum Coatings, Cube Beamsplitters and Waveplates/Plate Polarizers, Neutral Density Filters, Etalons |
All |
Metallic Coatings |
Inspections of Optics:
First, inspect the optics first to determine the severity of the contamination, decide which cleaning method you should use, and plan the blowing/draging/wiping paths. The steps are described bleow:
1. Wear gloves and finger cots before taking up the optics to avoid leaving fingerprints.
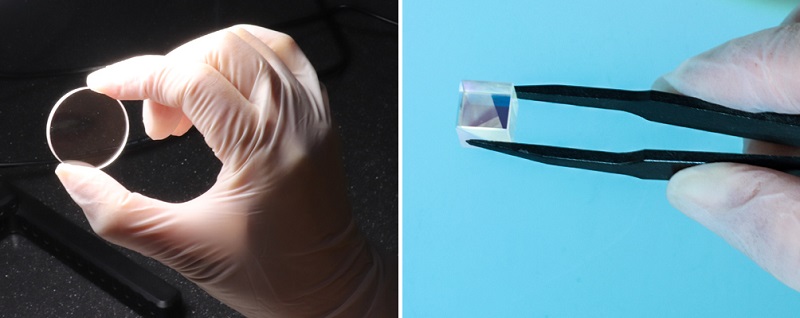
2. While holding the optics, do not touch the optical surface, always hold the edges of the optics. For optics of micro dimensions, pick-up instruments such as non-marring, bamboo, and plastic tweezers are convenient. Take caution that the tweezer is not metallic, which might induce additional scratches.
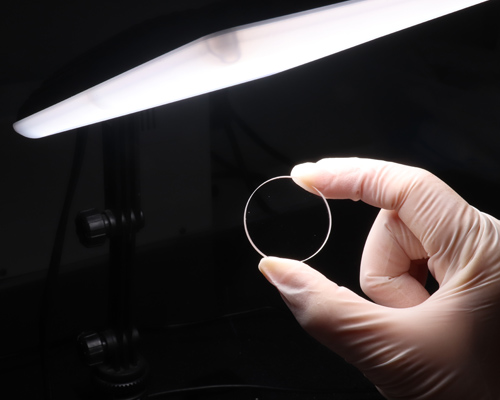
3. Put the optic under a bright light source and observe the optic at various angles until you become completely aware of all the contamination, and it is always better to hold the optic against a dark background during the operation since defects show more clearly this way. You might even use magnification tools if needed.

Figure1. Inspection of optics under a bright light source.
The Blowing Method
The blowing method is the mildest and safest approach for cleaning optics. A blower bulb filled with filtered air or nitrogen is the prevalent instrument for this. Other pressurized gases are not recommended since the gases are likely to deposit droplets of liquid on the optic once released. Do not use your mouth to blow the optic as spits of saliva might be splattered onto the surface. The objective of this act is to remove the loosely held dust and particles from the optic.
It is important to ensure that the optic does not have any particle or solid substance adhered to it before you implement any further cleaning steps because these particles will introduce abrasion and scratch when pulled along the surfaces during the dragging or wiping process. Therefore the blowing procedure should always be carried out no matter what cleaning method you select. Note that you do not point the nozzle of the blower at a right angle, but rather at a grazing angle to the optic so that the gas-only gives a gentle shove that will not cause damage. If the surface area is large, trail a figure 8 across the surface.
Note: For optics with fragile structures (e.g. polished escape surface of calcite polarizers), do not point the nozzle directly at the surface or place the nozzle too close.

Figure 2. and Figure 3. Hold the edges of the optic, or for micro-optics, hold it with a delicate tweezer.
The Drop and Drag Method
After thoroughly blowing the optic, if blowing-off is not sufficient, you might use the drop and drag method. Compared with the wipe method, drop and drag is more requisite for optics with flat surfaces. The proper steps are given below:
1. Remove the optic from its mount or housing if feasible.
2. Clean the edges of the optic first to ensure no dirt will be trapped in the lens tissue in the dragging afterwards.
3. Hold the optic’s edges.
4. Take a clean sheet of lens tissue, and dampen it with one or two drops of an appropriate solvent
5. Gently drag the lens tissue to remove the contaminants, during the process exert equal force until the tissue leaves the optical surface and cautiously plan the dragging path so that you only touch a minimum portion of the surface that is required. theoretically, if one follows the steps correctly, no streak of solvents will be produced. If there is a visible streak, take a new lens tissue and repeat the steps above until the streak vanishes.
The drop and drag method are excellent for eliminating fingerprints and other shallow stains, for dense contaminants repeated processes of drop and drag might be needed (Be careful you use a new and clean lens tissue each time you repeat).
The Wipe Method
The method is often applied to optics with curved surfaces (e.g Ball/ Half Ball Lenses, Spherical lenses) and mounted optics. Or for optics that are durable and resistant to abrasions, if the drop and drag process is not enough to clear some relatively stubborn stains, you might consider the wipe method. Because this method induces a few frictions to the surface before you start also cautious examine the surface and determine the wiping path, so that you only touch a minimum area no more than required.
1. Fold the lens tissue to create an edge that is a little longer than the optical surface, and clamp the lens tissue with forceps or a hemostat. For small optics, cotton tips could be the right substitute replacing lens tissue.
2. Dampen the tissue with the appropriate solvent. The tissue should be moist but not drip.
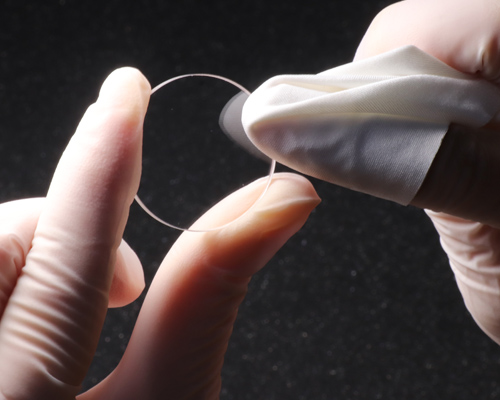
3. Wipe the tissue across the surface with one continuous and smooth motion, during the procedure slowly rotate the lens tissue, as this will change the contacting portion of the lens tissue to the surface and ensure the absorbed contaminants on the tissue will not be re-wiped onto the surface again.
4. Repeat the process until all contaminants are removed.
Streaks tend to form is the tissue is too saturated with solvents or where the edges of the tissue come into touch with the optics. If there is a streak forming, consider using a larger tissue dampened with methanol to remove the streak as methanol evaporates fast. And avoid dragging the tissue back and forth on the surface, the motion of wiping should always be in one direction.

Figure 4. The wiping method
The Bath/Immersion Method
The bath method should be used when the wipe method is too intense for the optic. A Petri dish is recommended as the container. Be careful not to implement this method on cemented or mounted optics.
The steps are:
1. Fill the Petri dish with the appropriate solvent, and pad the bottom of the petri dish with a soft lens tissue paper
2. Place the optic in the Petri dish and mildly clean it with a soaked cotton ball.
3. Take the optic out of the dish and dry it.
4. If there is a streak left after the drying process, use the drop-drag process to eliminate the streak.
Ultrasonic Cleaning:
During the process, the optic is put in an ultrasonic bath for approximately one minute. In fact, in the workshops, ultrasonic cleaning is a common automated measure for cleaning substrates prior to the coating process. However, for optics with gratings and coatings, ultrasonic cleaning could be disastrous because it causes the grating layer to detach from the substrate and coatings to peel off.
Storage of Optics:
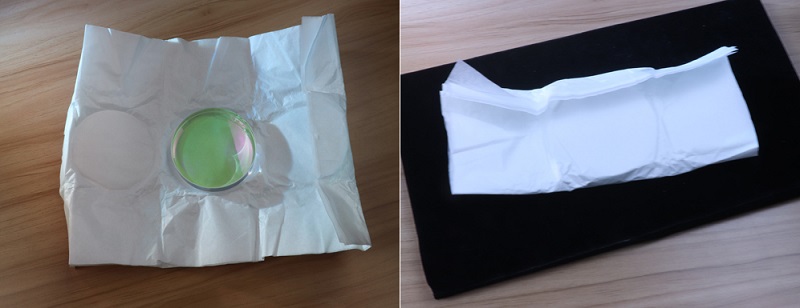
After cleaning, it is essential to store the optic decently to avert being contaminated again. Usually, the optic should be wrapped individually in chemically inert tissue paper and stored in a box designed for the optic.

Figure 5. and Figure 6. The protective paper wrapping of optics
Appropriate Cleaning Methods of Optics:
Optic/Method |
Blowing-Off |
Drop and Drag |
Wipe |
Bath/Immersion |
Ultrasonic Cleaning |
Bare Metallic Substrates and Deep-UV Coatings |
Yes |
|
|
|
|
Non-Metallic Bare Substrates |
Yes |
Yes |
Yes |
Yes |
Yes |
Cemented Optcis |
Yes |
Yes |
Yes |
|
|
|
Yes |
|
|
|
|
Single Layer MgF2 Coatings |
Yes |
Yes |
Yes |
Yes |
|
Protected Mettallic Coatings |
Yes |
Yes |
Yes |
Yes |
|
Laser Coatings (AR/HR) |
Yes |
Yes |
Yes |
Yes |
|
Pellicle Beamsplitters |
Yes, but do not touch the pellicle surface |
|
|
|
|
Yes |
Yes |
Yes |
|
|
|
Plate Beamsplitters |
Yes |
Yes |
Yes |
Yes |
|
Yes |
Yes |
Yes |
|
|
|
Plate Polarizers |
Yes |
Yes |
Yes |
|
|
Ultrafast Coatings |
Yes |
Yes |
Yes |
Yes |
|
Interference Filters |
Yes |
Yes |
Yes |
Yes |
Yes |
Colored Glass Filters |
Yes |
Yes |
Yes |
Yes |
Yes |
Neutral Density Filters (Metallic) |
Yes |
Yes |
|
Yes |
|
Neutral Density Filters (Absorptive) |
Yes |
Yes |
Yes |
Yes |
|
High Energy Coatings |
Yes |
Yes |
Yes |
Yes |
Yes |
Etalons |
Yes |
Yes |
Yes |
|
|
Tags: How to Clean Your Optics | Application Notes for Using Optics

